DIY Bathroom Grout and Tile Maintenance: A Step-by-Step Guide to Cleaning, Repairing, and Preventing Problems
Introduction: Reclaiming Your Bathroom’s Sparkle
The bathroom: a sanctuary for personal care, a place of cleanliness, and, all too often, a relentless battleground against moisture and grime. Grout, that porous material nestled between your tiles, and the tiles themselves, bear the brunt of this daily assault. Cracking, staining, and the insidious creep of mildew are common foes, turning a relaxing space into a source of frustration. According to the National Kitchen and Bath Association, improper bathroom cleaning is a leading cause of homeowner dissatisfaction, often leading to costly bathroom remodeling projects down the line.
But fear not, DIY enthusiast! This guide provides a comprehensive, step-by-step approach to DIY bathroom grout and tile maintenance, empowering you to reclaim your bathroom’s sparkle and prevent future problems. We’ll delve into identifying issues, arming you with the right tools, mastering effective bathroom cleaning techniques, repairing damage with confidence, and implementing preventative measures like applying a high-quality grout sealer. Prepare to transform your bathroom from a maintenance headache to a source of pride. One of the most rewarding aspects of home improvement is tackling projects yourself, saving money and gaining valuable skills.
DIY bathroom maintenance, particularly grout repair and tile cleaning, is an excellent starting point. Not only will you enhance the aesthetic appeal of your bathroom, but you’ll also proactively address potential structural issues caused by water damage. Consider this: neglecting minor grout cracks can lead to water seeping behind tiles, fostering mold growth and potentially damaging the subfloor. By taking a proactive approach to bathroom maintenance, you’re not just cleaning; you’re safeguarding your investment and ensuring a healthier living environment.
Learning effective mildew removal techniques and understanding the importance of proper ventilation are key components of this preventative strategy. Moreover, mastering these DIY skills extends beyond mere aesthetics and cost savings. It empowers you to personalize your bathroom maintenance routine, selecting cleaning products that align with your values and avoiding harsh chemicals that can damage surfaces or pose health risks. For instance, many homeowners are turning to eco-friendly bathroom cleaning solutions like vinegar and baking soda for routine maintenance, reserving stronger commercial cleaners for more stubborn stains or mildew. This hands-on approach fosters a deeper understanding of your bathroom’s unique needs, allowing you to tailor your maintenance efforts for optimal results. Remember, consistent bathroom maintenance, including regular tile cleaning and grout checks, is the key to preventing major problems and maintaining a sparkling, healthy bathroom for years to come. By implementing these strategies, you can avoid the need for extensive re-grouting or even full bathroom remodeling projects.
Identifying Common Grout and Tile Problems
Before you embark on your DIY bathroom grout and tile maintenance journey, accurately identifying the specific challenges you face is paramount. Grout and tile problems are not merely cosmetic issues; they can indicate underlying structural concerns and, if left unaddressed, lead to significantly more costly repairs. A thorough assessment will inform your approach, ensuring you select the most effective cleaning solutions and repair techniques. Understanding the nuances of each problem, from superficial staining to deep-seated mold, is the first step toward reclaiming your bathroom’s sparkle and preventing future issues.
This is especially relevant for bathroom remodeling projects, where pre-existing conditions can impact the longevity of new installations. Ignoring these warning signs can compromise the integrity of your entire bathroom design. Cracking grout is a common problem, often stemming from house settling, temperature fluctuations within the bathroom environment (especially around showers), or, critically, improper installation techniques. According to the Tile Council of North America, inadequate mortar coverage beneath tiles can lead to excessive flexing and subsequent grout cracking.
These cracks act as conduits for water, allowing it to penetrate beneath the tile surface, potentially damaging the subfloor and creating an ideal breeding ground for mold and mildew. Addressing cracking grout promptly with grout repair is essential not only for aesthetic reasons but also to prevent long-term structural damage. Furthermore, consider the type of grout used; epoxy grouts, while more expensive, offer superior crack resistance and water impermeability compared to cementitious grouts, making them a worthwhile investment for high-moisture areas.
Grout’s porous nature makes it particularly susceptible to staining from various sources, including soap scum, hard water deposits, and everyday spills. The composition of the stain will dictate the appropriate bathroom cleaning method. Organic stains, such as those from mildew, often respond well to oxygen-based cleaners, while mineral deposits may require acidic solutions like diluted vinegar. Identifying the stain type is crucial to avoid using harsh chemicals that could further damage the grout or tile.
Regular tile cleaning, incorporating a pH-neutral cleaner, can help prevent stain buildup and maintain the overall appearance of your bathroom. Remember to always test cleaning solutions in an inconspicuous area first to ensure they don’t discolor or damage the grout or tile surface. Proper ventilation is also key during bathroom cleaning to minimize exposure to fumes. Mildew and mold thrive in the consistently damp environment of a bathroom, posing both aesthetic and health concerns. Mildew typically presents as a surface discoloration, often appearing as black or gray spots on grout lines and sealant.
Effective mildew removal usually involves scrubbing with a bleach-based cleaner or a specialized mildew remover. Mold, however, can penetrate deeper into the grout and even the underlying substrate, presenting a more significant challenge. Black mold (Stachybotrys chartarum), while less common, requires professional remediation due to its potential health risks. Effective mold prevention strategies include ensuring adequate ventilation in the bathroom, promptly addressing leaks or water damage, and regularly applying a grout sealer to create a water-resistant barrier. Proper bathroom maintenance, including regular cleaning and sealing, is crucial for inhibiting mold and mildew growth and maintaining a healthy bathroom environment. Re-grouting may be necessary in severe cases of mold infestation to completely eliminate the source of the problem.
Essential Tools and Materials for Grout and Tile Maintenance
Success in grout and tile maintenance hinges on having the right tools and materials, transforming a potentially arduous DIY bathroom project into a manageable and rewarding home improvement endeavor. This checklist ensures you’re equipped for effective bathroom cleaning, grout repair, and comprehensive tile maintenance. For cleaning, a stiff-bristled grout brush is non-negotiable; it’s the primary weapon against embedded grime. Supplement this with a spray bottle for targeted application of cleaning solutions, durable sponges, and microfiber cloths for wiping surfaces clean.
Consider a range of household cleaners, from the mild acidity of vinegar to the potent disinfecting power of bleach (always used with extreme caution and proper ventilation). For stubborn stains or extensive mildew removal, invest in a quality commercial grout cleaner specifically formulated for bathroom maintenance. Remember that consistent tile cleaning is the first line of defense against future problems. Grout repair, including re-grouting, demands precision. A grout saw or specialized grout removal tool is essential for carefully extracting damaged grout without harming adjacent tiles.
A vacuum cleaner with a hose attachment efficiently removes debris. A mixing bowl is needed for preparing new grout to the correct consistency. A grout float ensures even application, and a sponge is used for wiping away excess. Crucially, select new grout that precisely matches the existing color for a seamless repair. Proper grout sealer application after repair is crucial for mold prevention and long-term protection. Finally, sealing grout and tile requires a quality grout sealer and an applicator brush or sponge for even distribution. Clean cloths are essential for wiping away excess sealer and preventing a hazy finish. Prioritize safety by wearing gloves, eye protection, and a mask, especially when working with bleach or during grout removal, as these activities can release harmful particles. Investing in quality tools and adhering to safety protocols will not only simplify the task but also ensure a professional-looking result and contribute to effective bathroom maintenance.
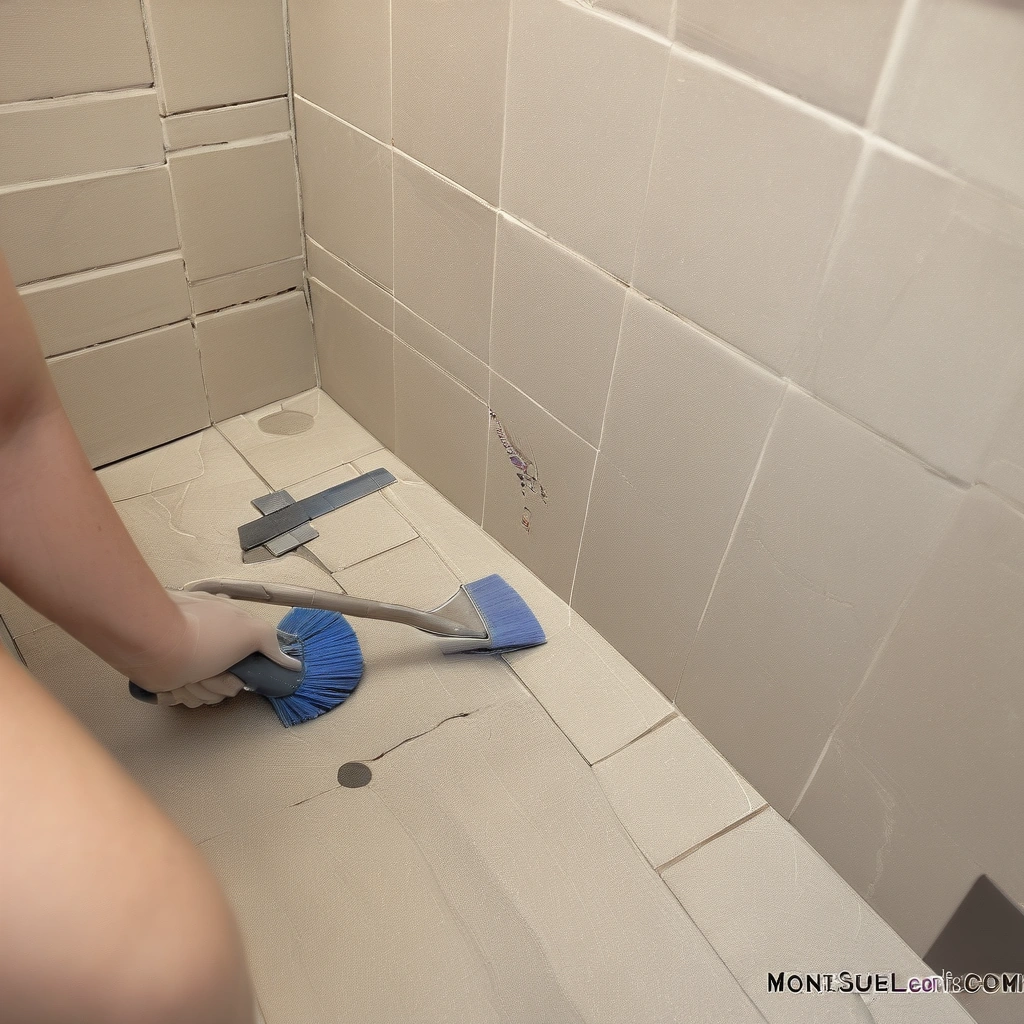
Step-by-Step Instructions for Cleaning Grout
Cleaning grout is a foundational aspect of bathroom cleaning and overall bathroom maintenance, acting as a critical preventative measure against staining and mildew buildup. This regular task, when performed diligently, can significantly extend the lifespan of your tile and maintain the aesthetic appeal of your bathroom. The frequency of cleaning depends on usage and ventilation, but a deep clean every one to three months is generally recommended. Neglecting grout cleaning can lead to stubborn stains that require more aggressive grout repair techniques, including re-grouting, which is a more labor-intensive process.
Prioritizing regular cleaning, therefore, is a time and cost-effective strategy. Before initiating the cleaning process, thorough preparation is key. Begin by removing all loose debris, hair, and surface dirt from the tile and grout lines using a vacuum cleaner with a brush attachment or a broom. This initial step prevents the cleaning solution from being diluted or rendered ineffective by the presence of particulate matter. Next, ensure adequate ventilation by opening windows or turning on the exhaust fan, especially when using commercial cleaning solutions that may contain strong chemicals.
Protect adjacent surfaces, such as vanities or shower doors, with plastic sheeting or drop cloths to prevent accidental exposure to cleaning agents. This meticulous preparation sets the stage for a more effective and efficient bathroom cleaning experience. Selecting the appropriate cleaning solution is paramount, and the choice often depends on the severity of the staining and the type of grout. For light to moderate staining, a homemade solution of equal parts white vinegar and water in a spray bottle is often sufficient.
Vinegar’s acidity helps to break down dirt and grime. For tougher stains or mold prevention, create a paste of baking soda and water, which acts as a mild abrasive. Commercial grout cleaners are also available, formulated with stronger chemicals for more demanding mildew removal and stain removal tasks. When using commercial solutions, always adhere strictly to the manufacturer’s instructions and prioritize safety by wearing gloves and eye protection. Regardless of the chosen solution, always test it in an inconspicuous area first to ensure it does not discolor or damage the grout or tile.
Once the cleaning solution is selected, apply it generously to the grout lines, ensuring thorough saturation. Allow the solution to dwell for 5-10 minutes, enabling it to penetrate the grime and loosen the bond between the dirt and the grout. For heavily soiled areas, a longer dwell time may be necessary, but avoid allowing the solution to dry completely. After the dwell time, use a stiff-bristled grout brush to scrub the grout lines vigorously. Apply firm, even pressure, working in small sections to ensure comprehensive cleaning.
For wider grout lines, consider using a brush with a larger head to cover more surface area efficiently. The scrubbing action dislodges the loosened dirt and prepares the grout for rinsing. Rinsing is a critical step in the bathroom cleaning process, as it removes all traces of the cleaning solution and dislodged dirt. Use clean water and a sponge to thoroughly rinse the area, ensuring that no residue remains. Pay particular attention to corners and crevices where cleaning solutions tend to accumulate.
After rinsing, inspect the grout lines for any remaining stains or discoloration. If necessary, repeat the cleaning and rinsing process until the grout is visibly clean. Once satisfied with the cleanliness, thoroughly dry the area with a clean microfiber cloth. This step prevents water spots and helps to inhibit the growth of mold and mildew. Proper drying is essential for maintaining the long-term health and appearance of your grout and tile. Finally, consider applying a grout sealer to protect your freshly cleaned grout and simplify future bathroom maintenance. This proactive approach significantly contributes to long-term mold prevention and reduces the need for frequent, intensive cleaning.
Repairing Cracked or Damaged Grout (Including Re-Grouting)
Cracked or damaged grout not only looks unsightly but also compromises the integrity of your bathroom. Here’s how to repair it: 1. **Remove the Old Grout:** Use a grout saw or grout removal tool to carefully remove the damaged grout. Be careful not to damage the surrounding tiles. This is a critical step, as any remaining loose material will prevent the new grout from properly adhering. For larger projects, consider an oscillating multi-tool with a grout removal attachment to expedite the process, but exercise extreme caution to avoid damaging the surrounding tile.
Remember, patience is key here; rushing can lead to chipped or cracked tiles, turning a simple grout repair into a more extensive and costly tile maintenance project.
2. **Vacuum the Area:** Use a vacuum cleaner with a hose attachment to remove all debris and dust from the grout lines.
3. **Mix the New Grout:** Follow the manufacturer’s instructions to mix the new grout to a smooth, paste-like consistency. Choosing the right type of grout is crucial.
For high-moisture areas like showers, consider epoxy grout, which offers superior water resistance and stain protection compared to cement-based grouts. However, epoxy grout is more challenging to work with and requires faster cleaning due to its rapid setting time. Cement-based grouts are more user-friendly for DIY bathroom projects, but require a quality grout sealer to prevent water penetration and mold prevention.
4. **Apply the Grout:** Use a grout float to press the new grout into the grout lines, ensuring they are completely filled.
5. **Remove Excess Grout:** Use the grout float to remove excess grout from the tile surfaces.
6. **Clean the Tiles:** Use a damp sponge to clean the tiles, removing any remaining grout residue.
This step requires diligence; multiple passes with a clean sponge and water may be necessary to remove the haze that forms as the grout dries. A slightly acidic bathroom cleaning solution can help dissolve stubborn grout residue, but always test it in an inconspicuous area first to ensure it doesn’t damage the tile. Proper tile cleaning is essential for achieving a professional finish.
7. **Cure the Grout:** Allow the grout to cure according to the manufacturer’s instructions (usually 24-72 hours).
8. **Seal the Grout:** Apply a grout sealer to protect the new grout from staining and moisture.
Re-grouting can be a time-consuming process, but it’s essential for maintaining the long-term health of your bathroom. Beyond the basic steps, consider the long-term implications of your grout repair. Implementing preventative measures is just as crucial as addressing existing damage. Regular bathroom maintenance, including consistent ventilation and prompt mildew removal, can significantly extend the lifespan of your grout and tile. Furthermore, the choice of cleaning products plays a vital role. Avoid abrasive cleaners that can erode the grout over time, opting instead for pH-neutral solutions specifically designed for tile and grout.
Investing in a quality grout sealer and reapplying it annually, or as recommended by the manufacturer, is a proactive approach to safeguarding your bathroom against water damage and the unsightly growth of mold and mildew. Effective grout repair is intrinsically linked to mold prevention and overall bathroom hygiene. Addressing the root causes of grout deterioration, such as inadequate ventilation or persistent leaks, is essential for preventing recurrence. Before undertaking any re-grouting project, thoroughly inspect the surrounding area for signs of water damage, including discoloration, bubbling paint, or musty odors.
These indicators may point to underlying plumbing issues that need to be addressed before proceeding with the repair. Neglecting these issues can lead to more extensive and costly repairs down the line. By taking a holistic approach to bathroom maintenance, you can ensure a healthy and aesthetically pleasing environment. For those embarking on a DIY bathroom renovation, understanding the nuances of grout and tile work is paramount. While re-grouting may seem like a straightforward task, achieving a professional-looking result requires attention to detail and a willingness to invest in the right tools and materials. Consider practicing on a small, inconspicuous area before tackling the entire bathroom to hone your skills and develop a feel for the materials. Numerous online resources and tutorials offer valuable insights and guidance, empowering homeowners to confidently undertake this rewarding home improvement project. Remember that proper preparation, meticulous execution, and ongoing maintenance are the keys to a successful and long-lasting grout repair.
Sealing Grout and Tile and Preventing Future Problems
Sealing grout and tile is a crucial step in preventing future damage. Here’s how to do it: 1. **Clean the Area:** Ensure the grout and tile are clean and dry.
2. **Apply the Sealer:** Use an applicator brush or sponge to apply the grout sealer to the grout lines. Avoid getting sealer on the tile surfaces.
3. **Allow to Penetrate:** Allow the sealer to penetrate the grout for the recommended time (usually 5-10 minutes).
4. **Remove Excess Sealer:** Wipe away any excess sealer from the tile surfaces with a clean cloth.
5. **Cure the Sealer:** Allow the sealer to cure according to the manufacturer’s instructions (usually 24-72 hours).
For optimal protection, reseal your grout every 1-2 years. In addition to sealing, maintaining good ventilation in your bathroom is critical. Run the exhaust fan during and after showers to reduce moisture buildup. Promptly address any leaks or water damage to prevent mold and mildew growth. Regularly clean your bathroom, paying attention to grout lines and tile surfaces. Use a squeegee after each shower to remove excess water from the walls and floor. A consistent cleaning routine is essential for preventing mold and mildew growth and maintaining the beauty of your bathroom.
The selection of an appropriate grout sealer is paramount for long-term bathroom maintenance. Penetrating sealers, which soak into the grout and create a hydrophobic barrier, are generally preferred over surface sealers that form a film on top. Consider the type of grout you have – epoxy grout, for example, is inherently more water-resistant and may not require sealing as frequently as cementitious grout. When choosing a grout sealer, read product reviews and select a reputable brand known for its durability and effectiveness in mold prevention.
For DIY bathroom projects, remember that proper surface preparation is just as important as the sealer itself; a clean, dry surface ensures optimal adhesion and performance. Beyond sealing, proactive tile maintenance plays a significant role in preserving your bathroom’s aesthetic and structural integrity. Regular tile cleaning with pH-neutral cleaners prevents the buildup of soap scum and hard water stains, which can degrade the grout over time. Pay close attention to areas prone to moisture accumulation, such as shower corners and around the bathtub, as these are breeding grounds for mildew removal.
If you notice any signs of cracking or crumbling grout, address it promptly with grout repair techniques like re-grouting to prevent water damage from seeping into the subfloor. Remember that effective bathroom cleaning isn’t just about aesthetics; it’s about safeguarding your home against costly repairs. Furthermore, integrating smart technologies can contribute to enhanced bathroom maintenance. Consider installing a humidity sensor that automatically activates the exhaust fan when moisture levels rise, ensuring consistent ventilation and aiding in mold prevention. Self-cleaning tile options, while a more significant investment upfront, can reduce the frequency of manual tile cleaning. When undertaking larger bathroom remodeling projects, explore advanced grout formulations that incorporate antimicrobial agents, offering an extra layer of protection against mold and mildew. By combining traditional techniques with innovative solutions, you can create a bathroom that is not only beautiful but also resilient and easy to maintain.