Introduction: A Sparkling Sanctuary
A gleaming bathroom is more than just aesthetically pleasing; it’s a sanctuary of cleanliness and a reflection of a well-maintained home. It speaks volumes about your commitment to hygiene and significantly impacts your home’s overall value. Think about it: a sparkling, mold-free bathroom is not only inviting but also contributes to a healthier living environment. This comprehensive guide delves into the practical, step-by-step aspects of maintaining your bathroom grout and tile, empowering you to prevent issues like mold, stains, and damage, and ensuring a sparkling clean space for years to come.
From understanding the nuances of different tile and grout types to mastering the art of stain removal and grout repair, we’ll equip you with the knowledge and techniques necessary to transform your bathroom into a pristine retreat. Imagine stepping into a bathroom where the grout lines are gleaming white, the tiles shine like new, and the air is fresh and clean. That’s the power of proper bathroom maintenance. This guide will cover everything from weekly cleaning rituals to tackling tough stains, providing you with effective, eco-friendly solutions and expert advice.
Whether you’re a seasoned DIY enthusiast or a beginner looking to improve your cleaning routine, you’ll find valuable insights and practical tips to keep your bathroom looking its best. We’ll explore the importance of regular cleaning and the science behind effective cleaning solutions, empowering you to make informed decisions about the products you use. From tackling common culprits like soap scum and hard water deposits to addressing more serious issues like mold and mildew, we’ll provide clear, concise instructions and demonstrate how simple preventative measures can save you time and money in the long run.
We’ll also delve into the specifics of grout repair, offering DIY solutions for minor cracks and guidance on when to call in a professional for more extensive damage. Finally, we’ll explore the critical role of sealing grout as a protective shield against future stains and water damage, ensuring your bathroom remains a sparkling sanctuary for years to come. This guide is your ultimate resource for bathroom grout and tile maintenance, covering everything from basic cleaning to advanced repair techniques. By following these guidelines, you’ll not only enhance the beauty of your bathroom but also protect your investment and contribute to a healthier home environment. Let’s embark on this journey to a sparkling, healthy, and beautiful bathroom together!
Know Your Surfaces: Tile & Grout Types
Understanding the composition of your bathroom surfaces is paramount to effective and long-lasting maintenance. The most common choices for bathroom tile are ceramic and porcelain, each offering a unique blend of aesthetics and practicality. Ceramic tiles, generally more affordable and easier to cut, are a popular choice for DIY bathroom renovations. However, their higher porosity compared to porcelain means they are more susceptible to water absorption and staining, necessitating more frequent sealing. Porcelain tiles, on the other hand, are fired at higher temperatures, resulting in a denser, less porous material that’s incredibly durable and resistant to moisture, making them ideal for high-moisture environments like showers.
When considering tile cleaning, the specific material dictates the appropriate cleaning solutions and techniques; abrasive cleaners, for instance, can damage the glaze on certain ceramic tiles, while porcelain can generally withstand more rigorous cleaning methods. Understanding these subtle differences is crucial for preventing damage and ensuring your tile investment lasts. Grout, the mortar that fills the spaces between tiles, presents its own set of maintenance challenges. Epoxy grout and cement-based grout are the two primary types, each with distinct characteristics.
Epoxy grout, composed of epoxy resins and a hardener, creates a virtually waterproof and stain-proof barrier, making it an excellent choice for areas prone to heavy water exposure. Its non-porous nature also inhibits the growth of mold and mildew, simplifying mold prevention efforts in the bathroom. Cement-based grout, while more traditional and cost-effective, is highly porous and requires regular sealing to prevent water penetration, staining, and the dreaded mold removal bathroom project. The type of grout you have significantly impacts your bathroom grout cleaning routine and the frequency with which you’ll need to perform sealing grout maintenance.
Beyond the primary materials, variations within each category further influence maintenance strategies. For instance, within ceramic tiles, you’ll find glazed and unglazed options. Glazed tiles have a protective coating that repels water and stains, simplifying cleaning. Unglazed tiles, while offering a more natural aesthetic, require more diligent sealing and are more prone to staining. Similarly, cement-based grout comes in sanded and unsanded varieties. Sanded grout is typically used for wider grout lines (1/8 inch or greater) to prevent cracking, while unsanded grout is better suited for narrower joints.
Selecting the appropriate grout type for your tile size is essential for preventing future grout repair needs. Therefore, before embarking on any bathroom cleaning or home improvement project, take the time to identify the specific materials in your bathroom. Are your tiles ceramic or porcelain? Is your grout epoxy or cement-based? Knowing the answers to these questions will inform your choice of cleaning products, sealing strategies, and overall maintenance routine. For example, a homeowner dealing with cement-based grout might invest in a high-quality grout sealer and establish a regular sealing schedule, while someone with epoxy grout might focus on preventing soap scum buildup.
This proactive approach, tailored to your specific surfaces, is the key to a sparkling and long-lasting bathroom. Finally, consider the finish of your tiles. Glossy tiles, while visually appealing, tend to show water spots and soap scum more readily than matte tiles. Matte tiles, on the other hand, can sometimes trap dirt and require more vigorous scrubbing. Understanding these nuances will help you adapt your bathroom cleaning techniques to achieve optimal results. Remember, effective tile maintenance isn’t just about cleaning; it’s about understanding the unique properties of your surfaces and tailoring your approach accordingly. This knowledge empowers you to prevent problems before they arise, saving you time, money, and the frustration of dealing with stubborn stains and costly repairs. A well-informed approach to bathroom maintenance is a cornerstone of successful DIY bathroom projects and a key element in preserving your home’s value.
The Weekly Ritual: Regular Cleaning
Regular cleaning is key to preventing buildup and maintaining a hygienic bathroom. This section outlines a simple, effective cleaning routine using gentle yet powerful solutions and tools. We’ll guide you through the process, emphasizing eco-friendly options that avoid harsh chemicals. Think of this weekly ritual as preventative home improvement; consistent effort minimizes the need for more intensive, costly interventions down the road. Neglecting regular bathroom cleaning allows grime, soap scum, and hard water deposits to accumulate, creating a breeding ground for mold and mildew, and potentially damaging tile and grout over time.
A few minutes each week can save hours of intensive scrubbing and costly repairs later. The cornerstone of your weekly bathroom cleaning should be a gentle, pH-neutral cleaner suitable for both tile and grout. Avoid abrasive cleaners, especially on natural stone tiles, as they can scratch and dull the surface. For DIY bathroom cleaning solutions, consider a mixture of warm water and a few drops of dish soap, or a diluted vinegar solution (always test on an inconspicuous area first).
Apply the cleaner with a soft sponge or microfiber cloth, paying close attention to grout lines where dirt and grime tend to accumulate. A grout brush with stiff bristles can be helpful for tackling stubborn stains, but be gentle to avoid damaging the grout. Remember, the goal is consistent maintenance, not aggressive scrubbing. After applying the cleaner, allow it to sit for a few minutes to loosen dirt and grime. Then, rinse thoroughly with clean water.
It’s crucial to remove all traces of the cleaning solution to prevent residue buildup, which can attract more dirt and create a dull film on your tile. Use a clean, dry cloth or squeegee to remove excess water from the tile and grout. Proper drying is essential for mold prevention, as mold thrives in damp environments. Pay particular attention to corners, edges, and areas around the shower or tub, where moisture tends to linger. Beyond the basic cleaning solution, consider incorporating a few specialized tools into your weekly routine.
A squeegee is invaluable for removing water from shower walls and doors, minimizing water spots and soap scum buildup. A grout brush, as mentioned earlier, is essential for scrubbing grout lines. For hard-to-reach areas, such as behind the toilet or under the sink, a long-handled brush or sponge can be helpful. Investing in these simple tools will make your weekly bathroom cleaning routine more efficient and effective. Remember to properly maintain your tools as well; rinse sponges and brushes thoroughly after each use and allow them to air dry to prevent the growth of bacteria and mold.
Finally, proper ventilation is a crucial, often overlooked, aspect of bathroom maintenance and mold prevention. After showering or bathing, always run the exhaust fan for at least 15-20 minutes to remove excess moisture from the air. If your bathroom doesn’t have an exhaust fan, open a window to allow for ventilation. This simple step can significantly reduce the risk of mold and mildew growth, protecting your tile, grout, and overall bathroom environment. Consider this part of your weekly ritual, contributing to long-term home improvement and a healthier living space. Regular bathroom grout cleaning and tile maintenance are integral to the upkeep of your home.
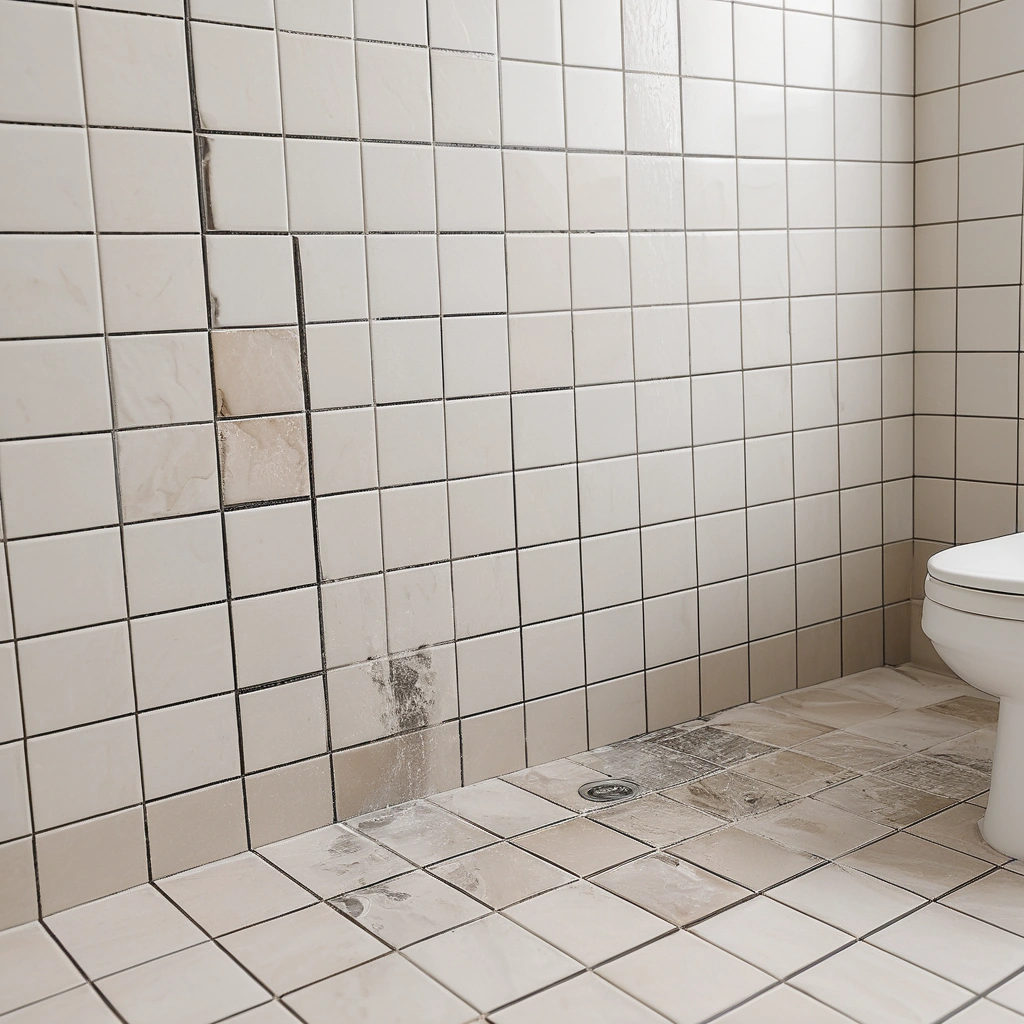
Stain Removal: Conquering Common Culprits
Conquering Common Bathroom Stains: A Comprehensive Guide From stubborn soap scum to unsightly mold and mildew, bathroom stains can be a persistent nuisance. This section tackles the most common culprits, providing detailed instructions and effective cleaning solutions for each, complete with illustrative before-and-after visuals for clear guidance. Understanding the nature of the stain is the first step towards effective removal. Soap scum, a filmy residue of soap and hard water minerals, requires a different approach than tackling the more serious issue of mold and mildew, which thrives in damp environments and can pose health risks.
Therefore, identifying the source of the stain will guide you to the most appropriate cleaning method and ensure optimal results. Soap scum, a frequent offender, can dull the shine of your tiles and grout. Tackle it with a simple DIY solution of equal parts white vinegar and dish soap in a spray bottle. Spray the affected areas, let it sit for 15 minutes, then scrub with a non-abrasive sponge or brush. For tougher buildup, a paste of baking soda and water can be applied and left to dry before scrubbing.
This gentle yet effective method is safe for most tile and grout types and avoids harsh chemicals. Remember to rinse thoroughly with clean water to reveal sparkling clean surfaces. For routine tile cleaning, a weekly wipe-down with a mild bathroom cleaner can prevent soap scum from accumulating. Mold and mildew, on the other hand, demand more aggressive treatment due to their potential health implications. Begin by ensuring proper ventilation in the bathroom to reduce moisture, the primary contributor to mold growth.
A solution of bleach and water (1 part bleach to 10 parts water) is a powerful mold and mildew killer. Apply the solution to the affected areas, let it sit for 30 minutes, then scrub thoroughly with a stiff brush. Always wear protective gloves and eye gear when working with bleach. For a more natural approach, a mixture of white vinegar and tea tree oil can be effective against mild mildew. However, for extensive mold infestations, professional mold removal bathroom services are recommended.
Preventing future mold growth requires consistent attention to bathroom ventilation and regular cleaning. Hard water stains, another common bathroom woe, appear as chalky white deposits on tiles, fixtures, and grout. These mineral deposits can be removed with a solution of equal parts white vinegar and water. Spray the affected areas, let the solution dwell for about 15 minutes, then scrub with a non-abrasive sponge. For stubborn hard water stains, commercial hard water removers are available, but always test in an inconspicuous area first.
Preventing hard water buildup involves regular cleaning and addressing the source of hard water, such as installing a water softener. This proactive approach can save you time and effort in the long run and maintain the aesthetic appeal of your bathroom. Finally, addressing grout discoloration and repair is essential for maintaining the overall appearance of your bathroom. Grout, being porous, is prone to absorbing stains and dirt. Regular grout cleaning with a grout brush and a specialized grout cleaner can effectively remove grime and restore its original color.
For stubborn stains, a paste of baking soda and hydrogen peroxide can work wonders. If the grout is cracked or damaged, grout repair is necessary to prevent water damage. Minor cracks can be addressed with DIY grout repair kits, while more significant damage may require professional intervention. Sealing grout after cleaning or repair is a crucial step in preventing future stains and water damage, ensuring long-term beauty and functionality. By understanding the specific needs of your tile and grout and implementing these targeted cleaning and maintenance strategies, you can conquer common bathroom stains and enjoy a pristine and hygienic space.
Grout Repair: DIY Fixes and Professional Help
Cracked or missing grout not only detracts from the aesthetic appeal of your bathroom but also poses a significant risk of water damage, potentially leading to costly repairs down the line. This section provides a comprehensive guide to addressing grout issues, covering DIY repair techniques for minor cracks and chips, and offering expert advice on when it’s time to enlist the services of a professional for more extensive damage. Identifying the extent of the damage is the crucial first step in determining the appropriate course of action.
For hairline cracks and minor chips, a DIY approach can often effectively restore the integrity of your grout. However, larger cracks, widespread deterioration, or recurring issues necessitate professional intervention to prevent further damage and ensure a lasting solution. For minor grout repair, begin by thoroughly cleaning the affected area using a grout brush and a mild bathroom cleaner to remove any dirt, grime, or soap scum. This ensures proper adhesion of the new grout. Select a grout that matches the existing color and type, whether it’s sanded or unsanded, and carefully apply it to the damaged areas using a grout float, pressing firmly to fill the voids.
Remove excess grout with a damp sponge and allow it to cure completely according to the manufacturer’s instructions. Sealing the newly repaired grout is essential for preventing future staining and water damage, protecting your investment in both time and materials. This simple DIY grout repair can significantly improve the appearance of your bathroom and prevent further deterioration. More extensive grout damage, such as widespread cracking, crumbling, or significant discoloration, often indicates underlying issues that require professional expertise.
A qualified tile contractor can assess the situation, identify the root cause of the problem, and recommend the most appropriate course of action, which may involve complete grout removal and replacement or even tile repair. Attempting to tackle extensive grout repair without the necessary skills and tools can exacerbate the issue and lead to more costly repairs in the long run. Professional tile contractors possess the experience and specialized equipment to ensure a seamless and long-lasting repair, restoring the beauty and functionality of your bathroom.
Recognizing the signs of serious grout damage is crucial for preventing further deterioration and potential water damage. Large cracks, deep holes, or loose grout should be addressed promptly by a professional. Additionally, if you notice recurring grout issues despite regular cleaning and maintenance, it may indicate a deeper structural problem or improper installation that requires expert attention. Proactive maintenance, such as regular cleaning with appropriate tile and grout cleaners, and sealing the grout every one to two years, can significantly extend the life of your grout and prevent costly repairs.
By understanding the different types of grout damage and knowing when to call in a professional, you can maintain a beautiful and functional bathroom for years to come. For instance, using a penetrating grout sealer, as recommended by many home improvement experts, can prevent mold and mildew growth, a common problem in bathrooms with high humidity. Regular bathroom cleaning, including tile cleaning and mold removal in bathroom areas, is also essential for maintaining a healthy and hygienic environment. Remember, proper tile maintenance is a key aspect of home improvement, contributing to both the aesthetic and structural integrity of your home.
Prevention: Proactive Steps for Long-Term Beauty
Prevention truly is the best medicine when it comes to maintaining a pristine bathroom. Proactive measures, such as ensuring proper ventilation, sealing grout, and conducting regular inspections, will not only minimize future damage and costly repairs but also keep your bathroom looking its best. These simple steps, easily incorporated into a regular cleaning routine, contribute significantly to the long-term beauty and hygiene of your bathroom. Proper ventilation is paramount in preventing mold and mildew growth, two common culprits in bathroom grime.
Run the exhaust fan during and after showers and baths to remove excess moisture, or if you lack a fan, crack a window to allow for air circulation. This simple act can drastically reduce the likelihood of mold and mildew taking hold, saving you the trouble of extensive cleaning and potential health hazards. Sealing grout is another crucial preventative measure. Grout, being porous, readily absorbs moisture, dirt, and grime, leading to discoloration and staining. Applying a sealant creates a protective barrier, making it easier to clean and preventing deep-seated stains.
Choose a high-quality grout sealant and follow the manufacturer’s instructions for application. This relatively small investment of time and money can significantly extend the life and beauty of your grout. Regular inspections play a vital role in catching minor issues before they escalate into major problems. Take a few minutes each month to examine your grout and tiles for cracks, chips, or signs of mold and mildew. Addressing these issues early on can prevent costly repairs down the road.
For instance, a small crack in the grout can be easily repaired with DIY grout repair, preventing water damage behind the tiles. Similarly, promptly addressing a small patch of mold can prevent it from spreading and becoming a larger, more difficult problem. Incorporating these preventative measures into your bathroom maintenance routine is a smart investment in your home’s value and your family’s well-being. Beyond ventilation, sealing, and inspections, consider using a daily shower spray to minimize soap scum buildup.
These sprays, available in various formulations, help prevent soap scum from adhering to tiles and grout, making weekly cleaning more efficient. Choose an eco-friendly option for a healthier home environment. Additionally, placing bath mats strategically to absorb excess water and wiping down surfaces after each use can further reduce the accumulation of dirt and grime. By combining these preventative measures with regular cleaning, you can ensure a sparkling, healthy bathroom for years to come. Remember, a little proactive care goes a long way in preserving the beauty and hygiene of your bathroom, making it a true sanctuary within your home. From simple DIY bathroom cleaning tips to more involved home improvement projects like grout repair, taking a proactive approach will save you time, money, and effort in the long run.
Mold & Mildew: Eradication and Prevention
Mold and mildew are unwelcome guests in any bathroom, thriving in the damp, warm environment. Not only are they unsightly, but they can also pose health risks, especially for those with allergies or respiratory sensitivities. This section provides a comprehensive guide to effective mold and mildew removal techniques and preventative measures, ensuring a healthy and sparkling bathroom. Identifying the problem is the first step. Mold often appears as black, green, or brown spots, while mildew tends to be gray or white and powdery.
Knowing the difference can help you target your cleaning efforts. For small areas of mold and mildew, a DIY approach using readily available cleaning solutions is often sufficient. Always wear protective gear, including gloves and a mask, during cleaning. One effective method for tackling mold and mildew on bathroom grout and tile is to create a paste of baking soda and water. Apply the paste to the affected areas and let it sit for about 30 minutes.
Then, using a scrub brush or an old toothbrush, vigorously scrub the grout and tiles. For tougher stains, a solution of white vinegar and water (equal parts) can be used. Spray the solution onto the mold and mildew, let it sit for an hour, and then scrub and rinse thoroughly. Avoid mixing bleach and vinegar, as this creates toxic fumes. In cases of severe mold infestation, it’s best to consult with a professional mold remediation service.
They have the expertise and specialized equipment to safely and effectively remove large areas of mold and prevent its return. Prevention is key to maintaining a mold-free bathroom. Proper ventilation is crucial; always run the exhaust fan during and after showers to remove excess moisture. Additionally, wiping down surfaces after each use can significantly reduce the likelihood of mold growth. Regularly inspect grout and caulk for any signs of cracking or deterioration, as these areas can harbor moisture and become breeding grounds for mold and mildew.
Repairing damaged grout and caulk not only improves the appearance of your bathroom but also contributes to a healthier environment. Sealing grout is another proactive measure that can prevent mold and mildew growth. Grout sealers create a barrier that prevents moisture from penetrating the porous grout, making it more difficult for mold and mildew to take hold. This is a simple DIY project that can make a significant difference in the long-term maintenance of your bathroom.
When choosing a grout sealer, consider the type of grout you have and select a sealer that is compatible. Apply the sealer according to the manufacturer’s instructions, ensuring proper ventilation. Regularly resealing your grout, typically every one to two years, will provide ongoing protection against mold, mildew, and staining. By incorporating these cleaning and prevention techniques into your regular bathroom maintenance routine, you can effectively combat mold and mildew, ensuring a healthier and more beautiful space. Remember, maintaining a clean and healthy bathroom is an investment in both your home and your well-being. A gleaming bathroom is a testament to your dedication to home improvement and a source of pride and enjoyment for years to come.
Hard Water Deposits: Restoring Shine
Hard water, laden with minerals like calcium and magnesium, can leave unsightly deposits on your beautiful bathroom tiles and grout, dulling their shine and creating a grimy appearance. These deposits, often appearing as white or grayish film, not only detract from the aesthetics of your bathroom but can also, over time, etch the surfaces of your tiles and grout, making them more susceptible to staining and damage. Learning how to effectively remove these deposits and, more importantly, prevent their recurrence, is crucial for maintaining a sparkling and hygienic bathroom.
This section delves into practical tips and solutions for conquering hard water buildup and restoring the luster of your bathroom surfaces. One of the first steps in tackling hard water deposits is understanding the type of tile and grout you have. Porous materials like some natural stones and unglazed ceramic tiles are more prone to absorbing mineral deposits, requiring gentler cleaning methods compared to non-porous surfaces like porcelain or glazed tiles. Always test cleaning solutions in an inconspicuous area first to avoid damaging your tile and grout.
For regular cleaning of hard water stains, a simple solution of equal parts white vinegar and water can work wonders. The acidity of the vinegar helps dissolve the mineral deposits without harsh chemicals. Spray the solution onto the affected areas, allow it to dwell for a few minutes, then scrub gently with a soft-bristled brush or a non-abrasive sponge. For tougher buildup, a paste of baking soda and water can be applied directly to the stains, left to sit for about 15 minutes, then scrubbed and rinsed.
Incorporating these cleaning practices into your weekly bathroom cleaning routine can prevent significant hard water buildup. Beyond regular cleaning, prevention is key to minimizing hard water deposits. Consider installing a water softener to reduce the mineral content of your water supply. This long-term solution can benefit your entire plumbing system and appliances, not just your bathroom. Another preventative measure is to squeegee or wipe down shower walls and floors after each use, removing excess water before it has a chance to evaporate and leave behind mineral deposits.
This simple step can significantly reduce the frequency of deep cleaning required. Regularly sealing your grout, especially with a penetrating sealer, creates a protective barrier against mineral absorption and staining, further simplifying maintenance. For stubborn hard water stains, especially on grout, consider using a commercial hard water cleaner specifically designed for bathroom surfaces. Always follow the manufacturer’s instructions and ensure adequate ventilation when using these products. Remember, consistent cleaning and preventative measures are far more effective than aggressive cleaning methods, which can damage your tiles and grout over time.
By understanding the nature of hard water deposits and implementing these practical tips, you can maintain a sparkling clean and healthy bathroom, preserving its beauty and value for years to come. Incorporating these practices into your regular home improvement and DIY bathroom maintenance routine will not only enhance the appearance of your bathroom but also contribute to a healthier home environment, free from the unsightly and potentially damaging effects of hard water buildup. This comprehensive approach, combining regular cleaning, preventative measures, and targeted stain removal techniques, ensures a consistently clean and hygienic bathroom, aligning perfectly with the principles of effective home improvement, cleaning, and DIY bathroom maintenance.
Sealing Grout: A Protective Shield
Sealing grout is a crucial step in bathroom maintenance, acting as an invisible shield against stains, water damage, and the growth of mold and mildew. This protective barrier is essential for preserving the aesthetic appeal of your tile and grout while also extending its lifespan. This process falls squarely within the realm of DIY home improvement and is a simple yet highly effective way to protect your investment and maintain a healthy bathroom environment. By understanding the process and choosing the right sealant, you can keep your grout looking pristine for years to come.
Before beginning the sealing process, ensure your grout is thoroughly cleaned and completely dry. This is paramount for effective sealant penetration and adhesion. Use a grout cleaner specifically designed for bathroom tile and follow the manufacturer’s instructions. For stubborn stains, consider using a grout brush or a mixture of baking soda and vinegar. After cleaning, allow the grout to dry for at least 24 hours, ensuring proper ventilation in the bathroom. This step is crucial, as applying sealant to damp grout can trap moisture and promote mold growth, negating the benefits of sealing.
Remember, proper preparation is the foundation of a successful sealing job. Choosing the right sealant is essential for optimal protection and longevity. There are two primary types of grout sealers: penetrating sealers and membrane sealers. Penetrating sealers soak into the grout’s pores, creating a barrier against water and stains while still allowing the grout to breathe. Membrane sealers, on the other hand, form a protective film on the grout’s surface. While both offer protection, penetrating sealers are generally preferred for bathroom grout due to their breathability, which helps prevent moisture buildup.
For areas exposed to frequent water contact, such as shower walls, consider a high-quality, water-based silicone sealant. When selecting a sealant, consider the type of tile and grout you have, as some sealers may react negatively with certain materials. Always test the sealant on a small, inconspicuous area first to ensure compatibility. Applying the sealant is a straightforward process that can be easily accomplished with a few tools. A small applicator bottle, often included with the sealant, or a small brush, allows for precise application along grout lines.
Carefully apply the sealant, ensuring full coverage of the grout while minimizing contact with the tile itself. Some sealers may require multiple coats for maximum protection. Refer to the manufacturer’s instructions for specific application and drying times. After application, allow the sealant to cure completely before exposing the grout to moisture. This usually takes between 24 and 72 hours. Taking the time to properly seal your grout is a small investment that yields significant returns in terms of bathroom cleanliness, mold prevention, and overall home improvement.
Regular cleaning and maintenance, coupled with periodic resealing, will ensure your grout remains pristine. While sealing provides substantial protection, it’s not a permanent solution. Depending on the type of sealant and the frequency of bathroom use, resealing may be necessary every one to three years. Regularly inspect your grout for signs of wear or discoloration, which may indicate the need for resealing. By incorporating grout sealing into your bathroom cleaning routine, you’ll not only prevent costly grout repair down the line but also maintain a healthier and more beautiful bathroom environment. This proactive approach to tile maintenance is a cornerstone of DIY bathroom care and contributes significantly to the overall value and appeal of your home.
Conclusion: A Sparkling Future
A pristine bathroom is a sanctuary, a testament to meticulous care and a reflection of a healthy home. By diligently following the guidelines presented in this ultimate guide, you’re not merely cleaning your bathroom; you’re investing in its longevity, preserving its aesthetic appeal, and safeguarding your family’s well-being. Regular bathroom grout cleaning and tile maintenance are more than just chores; they are proactive steps that protect your home improvement investment and contribute to a healthier living environment.
Think of it as preventative medicine for your bathroom, staving off potential issues before they escalate into costly repairs. Just as regular car maintenance prevents breakdowns, consistent bathroom cleaning prevents the buildup of grime, soap scum, and the dreaded mold and mildew, preserving the sparkle of your tiles and the integrity of your grout. This comprehensive approach to bathroom maintenance empowers you to take control of your space. From understanding the nuances of tile cleaning, whether it’s ceramic, porcelain, or natural stone, to mastering the art of grout repair, you’ll be equipped to handle most common bathroom challenges.
The DIY bathroom fixes outlined in this guide offer satisfying solutions for minor issues, saving you time and money. For more extensive damage, however, knowing when to call in a professional is crucial. This guide equips you with the knowledge to assess the situation and make informed decisions. Remember, early intervention is key to preventing further damage and minimizing repair costs. Proper ventilation, coupled with regular inspections and sealing grout, provides a robust defense against moisture, the primary culprit behind mold and mildew growth.
Mold removal bathroom procedures, while sometimes necessary, can be avoided with proactive measures. By incorporating these preventative steps into your routine, you’re not just cleaning your bathroom; you’re creating a healthier indoor environment for your family. Addressing hard water deposits, another common bathroom woe, is also within your grasp. The guide provides effective solutions for restoring shine and preventing the recurrence of these unsightly mineral buildups. From conquering common culprits like soap scum and mildew with targeted cleaning solutions to implementing long-term preventative measures like sealing grout, this guide empowers you with the knowledge and tools to maintain a sparkling, healthy bathroom for years to come. Embracing these practices transforms bathroom maintenance from a chore into a ritual of care, ensuring a space that is both beautiful and healthy, a true sanctuary within your home.