Bathroom Vanity Buying Guide: How to Choose and Install the Perfect Vanity
Introduction: The Importance of Choosing the Right Bathroom Vanity
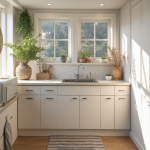
The bathroom vanity: often an afterthought, yet undeniably the cornerstone of any well-designed lavatory. More than just a place to wash your hands, it’s a statement piece, a storage solution, and a reflection of your personal style. Choosing the right vanity can elevate your bathroom from functional to fabulous, impacting both its aesthetic appeal and its overall utility. But with a dizzying array of options available – sizes, styles, materials, and configurations – the selection process can quickly become overwhelming.
This guide aims to demystify the world of bathroom vanities, providing you with the knowledge and tools necessary to make an informed decision and create the bathroom of your dreams. In the realm of home improvement, the bathroom renovation frequently tops the list for return on investment and enhanced quality of life. A well-chosen bathroom vanity is central to this upgrade. It not only provides essential storage for toiletries and cleaning supplies, reducing clutter and creating a more serene environment, but it also serves as a focal point that can dramatically alter the perceived value and style of the entire space.
Think of it as the anchor around which the rest of your bathroom design revolves. A successful bathroom remodel hinges on selecting a vanity that harmonizes with the overall aesthetic and maximizes functionality for daily use. For the DIY bathroom enthusiast, vanity installation presents an accessible yet impactful project. While seemingly straightforward, proper vanity installation requires careful planning and attention to detail. From ensuring accurate plumbing connections to achieving a level and secure mount, each step contributes to the longevity and performance of your new fixture.
A poorly installed vanity can lead to water damage, instability, and a host of other headaches down the line. However, with the right tools, a bit of patience, and this comprehensive vanity buying guide, you can confidently tackle this project and transform your bathroom into a personalized oasis. When considering bathroom design, the vanity often dictates the overall style direction. Are you drawn to the clean lines of modern minimalism, the rustic charm of farmhouse chic, or the timeless elegance of traditional design?
The bathroom vanity you select should complement your existing décor or serve as the inspiration for a complete bathroom remodel. For example, a sleek floating vanity paired with minimalist fixtures can create a contemporary spa-like atmosphere, while a reclaimed wood vanity with vintage hardware can evoke a sense of warmth and character. Exploring bathroom ideas through magazines, online platforms, and showrooms can help you refine your vision and identify the perfect vanity to bring your dream bathroom to life.
Beyond aesthetics, the practical aspects of a bathroom vanity cannot be overlooked. Consider your storage needs and daily routines. Do you require ample drawer space for makeup and personal care items? Would open shelving be more convenient for frequently used towels and toiletries? The internal configuration of the vanity should align with your specific requirements to ensure optimal organization and efficiency. Furthermore, the material of the vanity countertop and cabinet should be durable and easy to maintain, capable of withstanding the rigors of daily use in a humid environment. Investing in a high-quality vanity is an investment in the long-term functionality and enjoyment of your bathroom.
Factors to Consider When Selecting a Bathroom Vanity
Selecting the perfect bathroom vanity requires careful consideration of several key factors. Rushing into a purchase without proper planning can lead to costly mistakes and a less-than-satisfactory outcome. A well-chosen vanity elevates your bathroom design, enhances functionality, and adds value to your home, making the selection process crucial to a successful bathroom renovation or DIY bathroom upgrade. **a. Size and Dimensions:** Before even browsing vanity styles, meticulously measure your bathroom space, a critical first step in any bathroom remodel.
Consider the placement of existing fixtures, door swings, and walkways to maximize space and ensure comfortable movement. Standard vanity sizes range from 24 inches to 72 inches wide, accommodating various bathroom dimensions. However, smaller and larger options are available for unique bathroom layouts. For smaller bathrooms, consider a compact vanity or a corner vanity to save space. In larger bathrooms, a double vanity can provide ample storage and counter space. Remember, a cramped bathroom is never a desirable outcome, so prioritize functionality and flow.
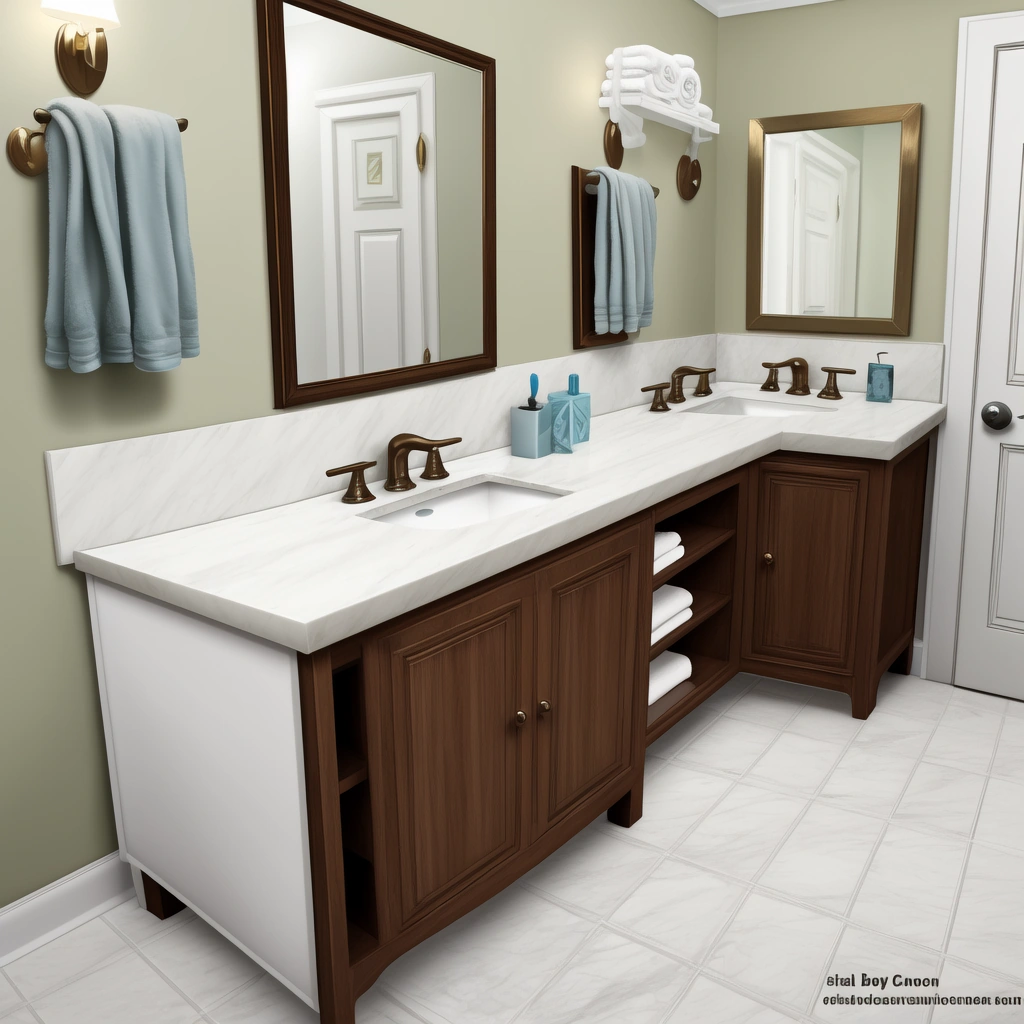
Visualize the space with the vanity in place to ensure a comfortable and efficient layout. Accurate measurements are essential for a seamless bathroom vanity installation. **b. Style and Design:** From sleek modern lines to rustic farmhouse charm, bathroom vanities come in a vast array of styles, offering options for every bathroom design aesthetic. Consider the overall aesthetic of your home and choose a vanity that complements your existing décor. Modern vanities often feature clean lines, minimalist hardware, and integrated sinks, adding a contemporary touch to your bathroom renovation.
Traditional vanities may incorporate ornate details, classic finishes, and vessel sinks for a timeless appeal. Rustic vanities, perfect for DIY bathroom projects, emphasize natural materials, a weathered look, and farmhouse-style sinks. Explore various bathroom vanity ideas online and in design magazines to gather inspiration. **c. Material and Finish:** The material of your vanity significantly impacts its durability, maintenance requirements, and overall appearance, key considerations for any home improvement project. Wood vanities offer a classic and timeless look but require proper sealing to prevent water damage.
Opt for moisture-resistant wood species like teak or cedar for enhanced durability in high-humidity environments. Laminate vanities are a more affordable and water-resistant option, ideal for budget-conscious bathroom upgrades. Stone vanities, such as marble or granite, are luxurious and durable but can be expensive. Quartz countertops provide a durable and low-maintenance alternative to natural stone. Consider the humidity levels in your bathroom when selecting a material, ensuring longevity and minimizing maintenance. **d. Sink Type and Faucet Compatibility:** The sink is an integral part of the vanity, impacting both aesthetics and functionality.
Vessel sinks sit on top of the countertop, creating a dramatic focal point and adding a touch of modern elegance to your bathroom design. Undermount sinks are installed beneath the countertop, offering a seamless and easy-to-clean surface, simplifying your bathroom cleaning routine. Integrated sinks are molded directly into the countertop, providing a clean and modern look. Ensure that your chosen sink type is compatible with your desired faucet style and that the faucet holes are appropriately placed.
Consider the height and style of the faucet in relation to the sink for optimal usability. **e. Storage Options:** A well-designed vanity should provide ample storage for toiletries, towels, and other bathroom essentials, maximizing organization and minimizing clutter. Consider the types of items you need to store and choose a vanity with the appropriate combination of drawers, cabinets, and open shelving. Drawers are ideal for smaller items like cosmetics and toiletries, while cabinets can accommodate larger items such as towels and cleaning supplies.
Open shelving provides easy access to frequently used items and can add a decorative touch to your bathroom vanity. Evaluate your storage needs and prioritize functionality when selecting a vanity for your bathroom renovation. **f. Budget Considerations:** Bathroom vanities range in price from a few hundred dollars to several thousand dollars, catering to various budget levels. Set a realistic budget before you start shopping and stick to it. Consider the cost of the vanity itself, as well as the cost of installation, plumbing, and any necessary accessories. Factor in the cost of any DIY bathroom projects you plan to undertake. Explore different retailers and compare prices to find the best value for your budget. A well-planned budget ensures a successful bathroom remodel without overspending.
Popular Bathroom Vanity Styles and Trends
Staying abreast of current trends can help you narrow down your choices and find a vanity that reflects your personal style while optimizing functionality. A well-chosen vanity can significantly elevate your bathroom design, transforming it from a purely utilitarian space into a stylish and relaxing retreat. From space-saving solutions to luxurious upgrades, the following trends offer inspiration for your bathroom renovation or DIY bathroom project. Floating vanities, a hallmark of modern bathroom design, offer a sleek, minimalist aesthetic.
By mounting the vanity to the wall, you create an airy, spacious feel, perfect for smaller bathrooms. This design choice also simplifies cleaning, eliminating the hard-to-reach area beneath a traditional vanity. For a DIY bathroom upgrade, installing a floating vanity can be a relatively straightforward project, offering a significant visual impact. Consider pairing a floating vanity with open shelving for a truly contemporary look. Double vanities are a practical and luxurious addition to master bathrooms, providing ample space for couples to get ready simultaneously.
This eliminates morning congestion and adds a touch of elegance to the space. When selecting a double vanity, consider the overall bathroom dimensions and ensure adequate clearance between the vanity and other fixtures. A bathroom remodel incorporating a double vanity significantly enhances functionality and resale value. Look for models with integrated storage solutions to maximize organization. Vanities with integrated lighting offer both aesthetic appeal and practical functionality. Built-in lighting eliminates the need for separate fixtures, streamlining the look of your bathroom vanity and providing optimal illumination for grooming tasks.
LED lighting options are energy-efficient and offer customizable color temperatures, allowing you to create the perfect ambiance for your bathroom. This feature is especially beneficial in bathrooms with limited natural light. Modern bathroom vanities often incorporate convenient features such as USB ports and outlets. These additions provide a dedicated space for charging electronic devices, such as toothbrushes, shavers, and smartphones, enhancing the functionality of your bathroom. When considering a vanity with these features, ensure the electrical connections are properly installed and comply with building codes, especially during a DIY bathroom project.
Sustainable materials are increasingly popular in bathroom design, reflecting a growing awareness of environmental responsibility. Vanities crafted from recycled wood, bamboo, or reclaimed materials offer a unique aesthetic while minimizing environmental impact. When choosing a sustainable vanity, look for certifications that verify the materials’ origins and manufacturing processes. This eco-conscious choice aligns with broader home improvement trends towards sustainability and responsible sourcing. Incorporating sustainable materials into your bathroom renovation not only benefits the environment but also adds a unique design element to your space.
Beyond these popular trends, consider incorporating unique design elements such as vessel sinks, waterfall faucets, and decorative hardware to personalize your bathroom vanity. Whether undertaking a full-scale bathroom remodel or a simple bathroom upgrade, carefully selecting a vanity that complements your style and needs is crucial. Remember to factor in storage requirements, material durability, and overall bathroom aesthetics to create a cohesive and functional space. A well-chosen bathroom vanity serves as both a functional centerpiece and a stylish statement in your bathroom design.
Step-by-Step Bathroom Vanity Installation Guide
Installing a new bathroom vanity can be a transformative DIY project, offering significant savings compared to professional Bathroom Renovation costs. However, a successful Vanity Installation hinges on meticulous planning and precise execution. This step-by-step guide provides a comprehensive overview, but remember to consult detailed manufacturer instructions for your specific Bathroom Vanity model. Safety is paramount; always wear safety glasses and gloves, and if you’re uncomfortable with any step, consider seeking professional assistance. A well-executed DIY Bathroom project not only saves money but also allows for personalized customization, perfectly aligning with your Bathroom Design vision.
**a. Tools and Materials Needed:**
* New bathroom vanity: Ensure it’s the correct size and style for your Bathroom Remodel.
* Level: A 4-foot level is recommended for accuracy.
* Pencil: For marking stud locations and cut lines.
* Stud finder: An essential tool for locating wall studs behind drywall.
* Drill with various drill bits: Including a hole saw for plumbing access.
* Screwdrivers (Phillips and flathead): A multi-bit screwdriver can be very convenient.
* Adjustable wrench: For tightening plumbing connections.
* Pliers: For gripping and manipulating small parts.
* Caulk gun and silicone caulk: Choose a mildew-resistant caulk specifically designed for bathrooms.
* Plumber’s putty: For creating watertight seals around drains.
* Measuring tape: Accurate measurements are crucial for a successful installation.
* Safety glasses: Protect your eyes from debris.
* Gloves: Protect your hands from chemicals and sharp edges.
* Utility knife: For trimming shims or scoring caulk.
* Shims: To level the vanity if the floor is uneven.
These are particularly important in older homes where floors may have settled. **b. Removing the Old Vanity (if applicable):** * Turn off the water supply to the sink: Locate the shut-off valves under the sink; if they’re corroded or don’t work, shut off the main water supply to the house.
* Disconnect the drain pipes and water supply lines: Place a bucket underneath to catch any residual water. Use an adjustable wrench to loosen the connections.
* Remove the old faucet and sink: This may involve unscrewing mounting hardware from underneath the sink.
Some sinks are attached with clips or adhesive.
* Carefully detach the old vanity from the wall: Look for screws or nails securing it to the studs. Use a pry bar if necessary, but protect the wall with a piece of wood. **c. Installing the New Vanity Cabinet:** * Locate the wall studs using a stud finder: Mark the edges of each stud clearly. Knowing the stud locations is critical for securely mounting the vanity.
* Mark the desired location for the vanity on the wall: Use the measuring tape to ensure accurate placement.
Consider the height of the countertop and its relation to the sink.
* Use a level to ensure the vanity is installed straight: Even a slight tilt can cause problems with water drainage and aesthetics. Use shims to level the vanity if needed.
* Secure the vanity to the wall studs using screws: Use screws that are long enough to penetrate the studs deeply (at least 2-3 inches). Pre-drilling pilot holes can prevent the wood from splitting.
For added stability, consider using construction adhesive in addition to screws. This is especially important for heavier vanities. **d. Connecting the Plumbing (sink and faucet installation):** * Install the faucet according to the manufacturer’s instructions: Each faucet model is different, so follow the instructions carefully. Use plumber’s tape on threaded connections to prevent leaks.
* Apply plumber’s putty to the drain flange and install the drain: Roll the putty into a rope and press it firmly around the underside of the drain flange.
Tighten the drain assembly securely.
* Connect the water supply lines to the faucet: Use new supply lines; old ones can be brittle and prone to leaks. Ensure the connections are tight but not overtightened.
* Connect the drain pipes: Use PVC pipes and fittings, and prime and glue them together according to the manufacturer’s instructions. Ensure proper slope for drainage. **e. Installing the Countertop and Backsplash:** * Apply silicone caulk to the top of the vanity cabinet: This creates a waterproof seal and helps to secure the countertop.
Use a high-quality, mildew-resistant caulk.
* Carefully place the countertop on the cabinet: Align it precisely and press down firmly to ensure good contact with the caulk.
* Install the backsplash using silicone caulk: Apply caulk to the back of the backsplash and press it firmly against the wall. Use painter’s tape to hold it in place while the caulk dries. Consider the aesthetic impact of the backsplash; it can significantly enhance your Bathroom Design.
**f. Final Touches and Considerations:** * Inspect all plumbing connections for leaks: Turn on the water supply slowly and check for leaks at all connections. Tighten any connections that are leaking.
* Apply caulk around the edges of the vanity and backsplash to seal any gaps: This prevents water from seeping behind the vanity and causing damage. Smooth the caulk bead with a wet finger for a professional finish.
* Clean up any debris: Remove any tools, materials, and trash from the work area. A clean workspace is a safe workspace.
* Consider adding decorative hardware: New cabinet knobs or pulls can add a personal touch and complement your Bathroom Ideas. Explore different finishes and styles to find the perfect match. This final step can elevate the entire Bathroom Upgrade, showcasing your attention to detail and design sensibilities. Remember to consult a Vanity Buying Guide to understand the different material and style options available for hardware.
Maintenance and Care Tips for Your Bathroom Vanity
Maintaining the allure of your newly installed bathroom vanity requires a consistent care routine, much like any prized possession in your home. Regular cleaning is paramount. Gently wipe down surfaces with a soft, damp cloth daily to remove dust, toothpaste splatters, and other common bathroom residues. Avoid harsh chemical cleaners, especially those containing bleach or ammonia, as these can dull the finish and even etch certain materials like natural stone. Instead, opt for gentle, pH-neutral cleaners specifically designed for bathroom surfaces.
For stubborn stains, a paste of baking soda and water can work wonders, gently lifting grime without damaging the vanity’s finish. Remember, prevention is key: promptly wiping up spills prevents staining and water damage, preserving the vanity’s pristine condition. Beyond surface cleaning, periodic deep cleaning is essential for maintaining hygiene and preventing mold and mildew growth, particularly in humid bathroom environments. Every few weeks, remove all items from the vanity top and drawers, and clean the surfaces thoroughly.
Pay close attention to the areas around the faucet and drain, where water tends to accumulate. For hard-to-reach crevices, an old toothbrush can be a valuable tool. Don’t forget the interior of drawers and cabinets, which can accumulate dust and debris. A quick vacuum and wipe-down will keep them fresh and organized. Incorporating these practices into your regular cleaning routine will significantly extend the lifespan of your bathroom vanity. Protecting your investment also involves safeguarding against water damage, a common culprit in bathroom deterioration.
Ensure your vanity top is properly sealed to prevent water from seeping into the material and causing warping or discoloration. For wood vanities, periodic resealing is crucial, especially around the sink area. A water-resistant sealant creates a barrier against moisture, preserving the wood’s integrity and preventing the growth of mold and mildew. Check the caulking around the sink and backsplash regularly, reapplying as needed to maintain a watertight seal. These preventative measures will not only protect your vanity but also contribute to a healthier bathroom environment.
Furthermore, consider the specific material of your vanity when determining the best cleaning and maintenance practices. Natural stone vanities, such as marble or granite, require specialized cleaners and sealants to protect their porous surfaces. Consult the manufacturer’s guidelines for specific care instructions. For laminate vanities, avoid abrasive cleaners and scrubbing pads, which can scratch the surface. Solid surface materials are generally more durable and resistant to stains, but regular cleaning is still necessary to maintain their appearance.
By tailoring your cleaning approach to the specific material of your vanity, you can ensure its longevity and preserve its beauty for years to come. Finally, remember that proper ventilation is crucial for preventing moisture buildup in the bathroom, which can damage your vanity and contribute to the growth of mold and mildew. Run the bathroom fan during and after showers to remove excess moisture from the air. If you don’t have a bathroom fan, consider installing one as part of your bathroom renovation. This simple upgrade can significantly improve air quality and protect your investment in your new bathroom vanity. By following these maintenance tips and incorporating them into your regular cleaning routine, you can ensure that your bathroom vanity remains a stunning focal point in your renovated bathroom, adding value and style to your home for years to come.